Thursday, December 31, 2009

Ringing In The New Year

A toast to the New Year! Ringing in the New Year! New Years Day recipe below~
Vintage New Years Noise Makers

Happy New Year Everyone 2010 has arrived! I hope you have had a wonderful holidays and are looking forward to the new beginnings that will arrive~
I look forward to sharing more this year with you. If you didn't know; I love scrap booking and journaling!! I have made a few scrapbooks and have some to do for Wedding gifts this year. I look forward to sharing what I am learning on the way, layouts that I have done and useful links.
Do you love to scrap or paper crafts or journaling? Do let me know. I have seen some fabulous work out there in blog land! If you are willing to share a page layout or tutorial let me know.
Drop by soon as there will be giveaways and more happening here in the New Year!! In the mean time if you drop over to MsArtists Mixed Media Playground you will see my New Years Moon Board and my Winter Journal Pages. I hope they inspire you to get creative in the New Year!

Here are the lyrics for Auld lang syne ~ Auld Lang Syne is a Scottish poem, thought to be composed by Scottish poet and lyricist Robert Burns in 1788. It is sung to the traditional folk tune Roud 6294.

Should old acquaintance be forgot,
and never brought to mind ?

Should old acquaintance be forgot,
and old lang syne ?

For auld lang syne, my dear,
for auld lang syne,
we’ll take a cup of kindness yet,
for auld lang syne.
And surely you’ll buy your pint cup!

Heres some recipes for your New Year s Day or any time ~ Simple and delicious! Recipes are via food network tried and love them, they wont disappoint!

Green Salad with Mustard Vinaigrette, Standing Rib Roast and Mashed Potatoes.

Green Salad-

Mustard Vinaigrette: ( serves 4)

  • 1 garlic clove, sliced in 1/2
  • 1 teaspoon Dijon mustard
  • 1 tablespoon balsamic vinegar
  • Small splash soy sauce
  • Salt and freshly ground black pepper
  • 3 tablespoons olive oil

Directions

3 cups mixed salad greens, the darker the better (not iceberg)

Rub the inside of a large wooden bowl with the garlic clove and then either discard it or save it for another use. Put the mustard in the bowl and whisk in the balsamic vinegar and soy sauce (a French secret!) vigorously for about 10 seconds to get a creamy consistency. Season with salt and pepper, to taste. Drizzle in the olive oil as slowly as possible with 1 hand while whisking as quickly as possible with the other hand to emulsify. Lay the salad greens on top of the dressing and toss just before serving. ( I add dried cherries 1 bag, a little purple onion sliced thinly, 1 red bell pepper sliced thinly and fresh tomatoes. This adds color and flavor that you can't beat!)

Standing Rib Roast- (Serves 6+approx)

  • 1 (5-pound) standing rib roast
  • 1 tablespoon House Seasonings, recipe follows

Directions

Allow roast to stand at room temperature for at least 1 hour.

Preheat the oven to 375 degree F. Rub roast with House Seasoning; place roast on a rack in the pan with the rib side down and the fatty side up. Roast for 1 hour. Turn off oven. Leave roast in oven but do not open oven door for 3 hours. About 30 to 40 minutes before serving time, turn oven to 375 degrees F and reheat the roast. Important: Do not remove roast or re-open the oven door from time roast is put in until ready to serve.

House Seasoning: The seasoning mix is more than you need for recipe~

  • 1 cup salt
  • 1/4 cup black pepper
  • 1/4 cup garlic powder


Mashed Potatoes (serves approx 3)
  • Kosher salt
  • 1 1/2 pounds boiling potatoes
  • 1/4 cup milk
  • 4 tablespoons (1/2 stick) unsalted butter
  • 1/2 cup buttermilk
  • 1/4 teaspoon freshly ground black pepper

Directions

In a large pot, bring 2 quarts of water and 1 tablespoon of salt to a boil. Meanwhile, peel the potatoes and cut them into 1 1/2-inch cubes. Add them to the boiling water and bring the water back to a boil. Lower the heat and simmer uncovered for 10 to 15 minutes, until the potatoes fall apart easily when pierced with a fork.

Meanwhile, heat the milk and butter in a small saucepan, making sure it doesn't boil. Set aside until the potatoes are done.

As soon as the potatoes are tender, drain them in a colander. Place a food mill fitted with a small disk/blade over a heatproof bowl. Pass the potatoes through the food mill, turning the handle back and forth. As soon as the potatoes are mashed, stir in the hot milk mixture with a whisk or rubber spatula. Add enough buttermilk to make the potatoes creamy. Add 1 teaspoon of salt and the pepper, and serve hot. To keep the potatoes warm, place the bowl over a pan of simmering water for up to 30 minutes. You can add a little extra hot milk to keep them creamy.

Now what to have for dessert? I always love a good cheesecake! Trader Joes has a great one! Did I say frozen? Only you would know, right? Serve it all with your favorite wine and you have a quick, easy and wonderful meal!

Thursday, December 10, 2009

Holiday Ornament Tutorial

This ornament was printed larger as a door hanger~


Lets get started~
To make any kind of paper ornament similar to this you will need:
(more examples at bottom of post)

* Thin recycled cardboard ( from cracker or cereal box )
* Gesso or white paint
* Images printed on Card Stock or old postcards or old Christmas card images ( 2 locations for free images at bottom of blog if printing your own )
* A bone folder or something to press and smooth with
* scissors and a paper cutter ( or just one of those items )
* brads
* ribbons ( some textured and thicker, some thin for hanging )
* Christmas paper or any other scrapbook paper
* Easy Tack by Krylon
* Wax paper
* pencil for marking cuts if using only scissors
* hole punch
* hot glue gun and glue sticks
* or glue that dries clear
*tweezers
You can see I chose Santa for the front and checker paper for the back side-
I trimmed the edges of the white off the paper for only my image-
Trimmed Santa

Cut cardboard to the same size as the ornament you are making-
I took the checkered paper and allowed for overlay-
I used the bone folder to smooth over edges to front, don't worry the Santa will cover up the front and these won't show! I fold over prior to spraying to have folds made so securing to adhesive is quick and goes smoothly **If your cardboard has images cover with gesso or white paint and let dry or blow dry prior to securing paper on!
I use the paper adhesive to spray on the paper lightly and cardboard! As you can see from the photo below I don't spray the fold over sides until the back surface is adhered!** Ensure your room is well ventilated and that you have wax paper or something protecting your table surface or do it in a garage or outdoors weather permitting!
First I affixed the cardboard to the checkered paper and smoothed it out for no wrinkles, then I turned it over to secure fold over edges: spray edges fold down and smooth out.
Now I sprayed the rest of the cardboard with the folded edges and laid my Santa image on top.
Then I smoothed out the paper securing it to the card board. It dries very quickly. Don't worry if you have a little overhang if you are covering with ribbon, twine or other. If you have overhang and aren't covering with ribbon carefully trim any excess ensuring you aren't cutting too much and getting too far into your image or plan out your ornament for more accuracy- meaning that you have measured and cut equally to start.

You can get seasonal brads from Michaels, Walmart or any craft store-
With your hole punch add a hole where you would like it to hang from- **But adhere any outside ribbon you are adding prior to adding your loop to hang from and then your brad! See below~

I used a hot glue gun and carefully placed the outside ribbon on a section at a time as to adhere it to exactly where I wanted. (You can use tweezers to aid holding it in position to keep from burning your fingers!) After the outside ribbon is attached add your second ribbon choice through your hole and then your brad and you are done.


You may cut out different images ( if you are reselling insure there is no copyright!! ) You may cut different shapes. This is just a basic easy to do ornament for anyone. Including doing it with children if you are helping them~ If you use this tutorial do post an image link to what you have made in the comment section as I would love to see. For images you can find two free image sights at the bottom of the blog! Feel free to share a link to the tutorial with credits to me!
Happy Creating- PS you can do this any time of year with seasonal images!

Friday, December 4, 2009

Christmas Crafts

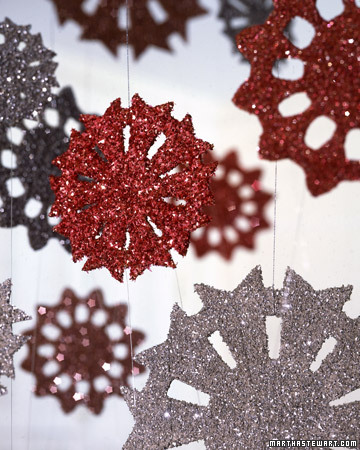
Image via Martha Stewart.com

Hello Crafters I am going to link a few sites with some free tutorials,
printables and such. Hope you enjoy them!

So the queen of crafts always has some must see items and these easy glitter snowflakes are at Martha Stewart~ She even has a video! Well of course she does ;)


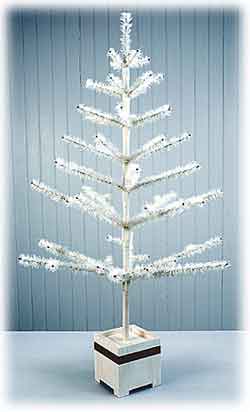
Image via Victoriana.com

Did you ever dream of making a feather tree? I have always thought that they were so beautiful!
Imagine the one above decorated! But who knew they could be so cheap to make??!! $6.00 Check out this how to at Dollar Store Crafts. She has a great image of it done and decorated!
How about a little history on the feather Christmas tree~ Victoriana will make you swoon~

Image via boderlinebonkerscrafts.blogspot.com

Then if you like to make paper ornaments you'll have to drop by CreativitE Erin has a design to lift your spirits and make your fingers get to work.

Here is a video tutorial from ShopChop Suey that shows a similar style that is quite easy to make~

Snow Top Pillow Boxes and Tags:
Over at Creature Comforts she has some printable tags and boxes with directions you can make from another designer Daisy Jane! (Sorry images not available drop over and see them~)

Tuesday, December 1, 2009

Ornaments, gifts and inspiration~

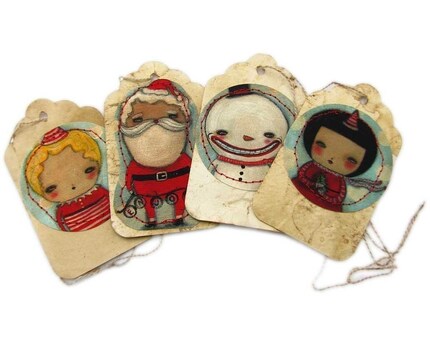
Image via Danita.Art @ Etsy

Ok so you say you don't have time to make those Christmas items like ornaments, gift tags and more. Or you are looking for a little inspiration to get you right on track well one of my favorite folk artist's is Danita! She has an Etsy shop filled to the brim so take a peek at her work and you will fall in love too! Danita Art hop on over and I guarantee that you won't want to miss a purchase of one of these fine folk art work pieces~ Swoon! For the season~
Don't forget to stop by for more links to inspiration, arts and crafts through out the season~
Cath Kidston